NEW! Reverse Wood Burned
NEW! Reverse Wood Burned
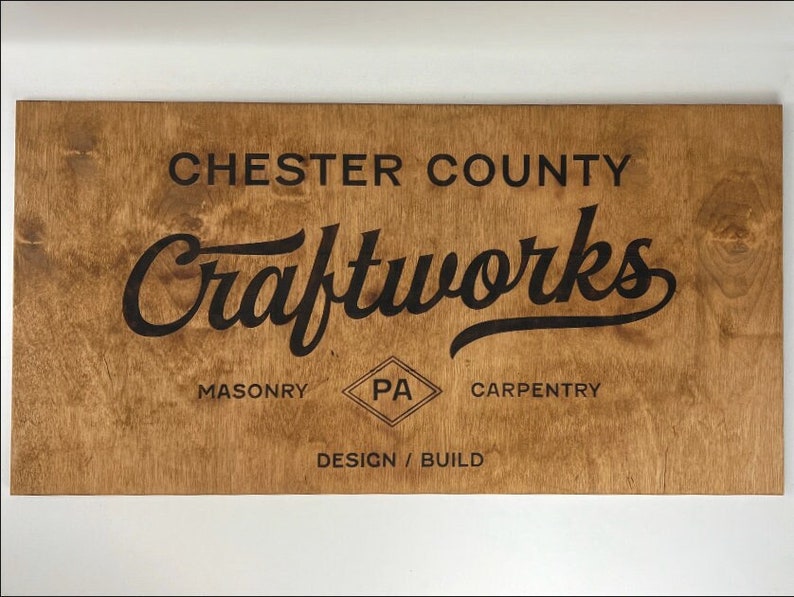
Artisan Branding: Custom Reverse Wood Burned Signs
Depth You Can Feel, Contrast You Can’t Miss
Why settle for a flat, printed sign when your brand can have dimension? Our Reverse Wood Burned Signs use a specialized laser-engraving technique that carves away the background, leaving your logo raised and untouched. This "relief" style creates a striking 3D effect that highlights the natural grain of the wood while making your brand literally pop off the surface.
The Alchemy of Fire and Birch
We don’t just engrave; we finish each piece by hand using a combination of precision technology and traditional woodworking. Every sign is crafted from premium birch, laser-etched for machine perfection, and then finished with a heat gun and blow torch to achieve a spectacular, high-contrast dark char.
Tactile 3D Relief: Your logo isn't just a design; it's a raised physical entity with a "smooth-like-butter" finish.
Dual-Heat Finishing: The unique color contrast is achieved through manual torching, ensuring no two signs are exactly alike—giving you a true piece of custom wood art.
Bespoke Design Experience: Work 1-on-1 with our graphic designer, Foster, to ensure your digital logo is optimized for the best possible wood-burn contrast.
Product Specifications & Details
| Feature | Details |
| Material | High-Grade Sustainable Birch |
| Technique | Reverse Laser Engraving & Hand-Torched Charring |
| Texture | Raised 3D Logo with Sanded Smooth Finish |
| Mounting | Sawtooth Hangers (Included) or Optional Standoffs |
| Best For | Rustic Offices, Modern Studios, Branding Photography |
| Guarantee | Lifetime Guarantee on Artisan Craftsmanship |
Frequently Asked Questions
What is the difference between a "Burned" and "Reverse Burned" sign?
In a standard burned sign, the laser char-marks your logo into the wood. In a Reverse Burn, we engrave the entire background area surrounding your logo. This leaves your logo at the original height of the wood while the dark, torched background recedes, creating a premium 3D relief effect.
Will the burned background rub off on my walls?
No. After the torching process, we sand each sign for a smooth finish and apply a professional sealant. This locks in the rich, dark tones and ensures the sign is clean to the touch and protected from fading.
What type of wood do you use?
We use premium birch, chosen specifically for its light, consistent grain. This provides the perfect "blank canvas" so that when we apply the blow torch, the contrast between the natural wood logo and the blackened background is as sharp and professional as possible.
How do I mount my reverse burned sign?
Every order includes 2–3 sawtooth hangers for a flush, traditional mount. For a more modern, architectural look, we offer optional Gold, Silver, or Black Standoffs which allow the sign to "float" off the wall by about an inch.
Is my logo too detailed for wood burning?
Laser technology allows for incredible precision, capturing even fine lines. However, because wood is a natural medium, we provide a design consultation with every order. We will review your logo and let you know if any small adjustments are needed to ensure it looks crisp when torched.
Couldn't load pickup availability
How To Order
How To Order
We offer 1-on-1 personalized experiences to all of our clients. To begin the ordering process:
1. Select your size, color, and hardware customizations from the menu above. Not 100% sure what you like? Start with your favorite options for now.
2. Upload your logo or graphic (if you have one). Vector files (.ai .eps .pdf .svg) are preferred. We can also work with a different file type with high resolution
3. Once you have placed your order, one of our customer experience specialists will reach out to you via email within 1-2 business days to answer and questions and finalize details.
4. Then, we will create a digital proof of your sign for review. If you were unsure about any of your customization options at checkout, this is the time where you can adjust, compare, and make your final decision. We will not laser cut anything until the design is approved.
Materials
Materials
1/2" birchwood
Mounting Instructions
Mounting Instructions
2 - 3 sawtooth hangers are included with every order to easily and accurately mount your sign.
1. On the back of your sign, measure a horizontal line ¼ of the way down from the top of the sign. Use a t-square or level to ensure that the line is straight. Along this line, mark the center point and 6 inches from each side.
2. Position your sawtooth hangers evenly along this horizontal line. If you have two sawtooth hangers, lay them at the 6-inch point from each side. If you have three hangers, position the remaining hanger directly in the center of line. The sawtooth hardware has a mark in the very center to make it easier to line it up on the back of the frame.
3. When the sawtooth hangers are lined in place, mark the screw holes with a pencil. Then, take the screw line it up with the mark you just made, and gently screw it into place. Try to screw it in as straight as you can.
4. Hold the sign up to the wall, and mark where you want the top of it to rest with pencil or painter's tape. Try to make the mark in the center if you can.
5. Measure down ¼ way down from this point to mark where the sawtooth hangers will line up. Use a level to draw a straight horizontal line. Once again, along this line, mark the center point (if you have three hangers) and 6 inches from each side.
6. Just below the marked lines, hammer a nail down into the wall at a 45-degree angle to provide the most support.
7. Position the sawtooth hanger across from the nail and slowly lower it into place until you feel it snag on the nail. Use a level to confirm it is straight. You may need to shift the sign slightly along the teeth until it’s in the position that you want it.